Showing posts with label mulch. Show all posts

Tuesday, May 7, 2019

Growing Tomatoes in Containers

This year’s Great Tomato Growing Experiment: is this small area (4’x16’), adjacent to a north-facing fence, truly the sunniest spot on the property?

After monitoring my entire full sun-deprived Folsom yard for nearly three years, this one spot, near the garage, may be the one area that gets more than eight hours of direct sun a day, perfect for growing tomatoes.

The dilemma (well, two dilemmas, actually): because it is a concrete surface, the tomatoes must be grown in containers; and, how do you avoid water stains on the concrete when the barrels drain?

Solution: use a big container (in this case, half barrels with five 7/8” drain holes drilled through the bottom) and place that container on top of a catch basin with several 3/4” holes drilled on the side rim on the back side, allowing the water to drain from the catch basin to the  12” wide gravel area along the fence line.


The prototype catch basin was at the suggestion of radio guest Lori Ann Asmus, who decorates Christmas trees professionally (you can see her work during the holiday season at various lobbies in public buildings, including the downtown Sacramento’s Citizen Hotel).
The catch basins were, in reality, meant for placing beneath Christmas trees to catch any water overflowing the tree holders. They are available wherever fine Christmas tree accessories are sold (such as Emigh Hardware, in December).

The barrel/catch basin combo have shims under the front side, allowing a gentle slope towards the fence, coaxing the water to go out the back side of the holes in the catch basin and into the gravel. So far, so good.

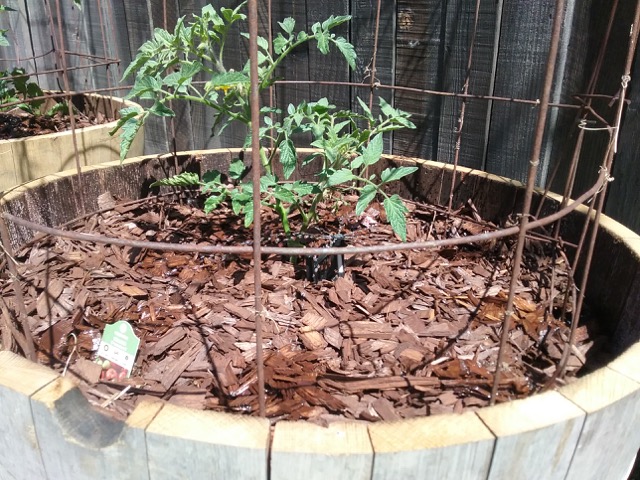
Regarding the container dilemma: when planting thirsty summer vegetables in full sun, try to use the largest containers, preferably made out of something that doesn’t allow heat build-up, such as plastic (it’s not unusual for the soil in an unprotected plastic pot in full sun to reach temperatures in excess of 140 degrees on a day in the upper 90’s). A wood barrel works perfect for that purpose. Plus, the greater volume of soil in a barrel (as opposed to a 15-gallon plastic pot) also helps the plant avoid stress from dried-out soil if you miss a watering during 90 and 100-degree days. And, more soil means more room for root development.

Because a container plant may need water every day in the summer, I’ve given these two tomato plants (a Champion 2 full size tomato and a very popular grape tomato I have never tried before, Juliet) their own watering system: a battery operated timer on a nearby faucet with a Y-adapter. Connected to the timer is a short, half-inch drip line run, going along the backside of the barrels.

Connected to the half inch line: quarter inch tubing snaked through a small hole on the lower backside of the barrel, and topped off with an adjustable drip bubbler/sprinkler in the middle, which sends out 6 or 8 even streams of water in a circle. Unfamiliar with drip irrigation systems? Entire kits are available, such as this.

https://amzn.to/2DSusag


Pro tip: run the quarter inch line in the barrel BEFORE filling it with a good quality potting soil. (By the way, “Pro Tip” = “lesson learned the hard way”).


The tomato cages are made from 4’x5’ sheets of concrete reinforcement wire, 6” mesh (for easy reaching of the tomatoes). Bend the sheets in a circle and fasten with plastic zip ties. Or, use your barbed wire tool (what? everyone doesn’t have a barbed wire tool?) to cut off the vertical 12-gauge wire ends on one side, and then bend the free horizontal wires around the opposite side.

Watering containerized plants is tricky, and must be increased or decreased more frequently, depending on the weather. Having a nearby faucet/timer/drip system in place helps ease those adjustments.

Fertilization can also be tricky. Because of the leaching nature and frequent watering that an easy-draining potting mix needs during the summer, fertilizers must be applied more frequently. Note that “frequently” does not mean “more fertilizer”. If, for example, the directions on your slow-release vegetable fertilizer package advises fertilizing with a certain dosage once a month, modify it to meet the needs of your container plant: cut the dosage in half, and apply every other week.
Don’t forget that topping that containerized plant with a few inches of a bark mulch can help maintain soil moisture on a hot day and also keep the soil temperature moderate.

Saturday, April 8, 2017

How Can I Improve My (Expletive Deleted) Clay Soil?

From the garden e-mail bag, Gordon of Lodi writes: "I've about had it with clay/hard pan soil. The soil map for Lodi/Stockton says we are supposed to have sandy loam.  Give me a break!  I bought a 30 lb. bag of gypsum pellets and I'm willing to dig it in everywhere. But, how much do I use? I found an article online. It says to add 20-30 lbs. per 1000 sq. ft. of garden area. I'm not going to work up 1000 sq. ft.!  How about a cup full in 10-20 sq. ft. every three years?"

Gordon, how about getting a soil test done first? California's Central Valley is made up of many different soil types, so yours may not be representative of what you researched. 

Gypsum is effective on soils high in salts; it does nothing to improve the permeability of our clay soils, most of which do not have a salt issue. Still, only a soil test can determine that. By the way, gypsum is very slow to work. It needs to be added (for that salinity problem) on a regular annual basis, not once every three years.

Usually, the reasons for the expletives used against clay soil include symptoms such as slow draining soil, difficult to dig soil, or hardpan layers.


This time of year, especially after a rainy winter, compaction of clay soil is not uncommon (quit walking on wet clay soil!).


Don't want to be a scientist? Then, build a raised bed and plant in that, using a high quality commercial soil mix. To improve water penetration, be sure to mix in some of the new soil into the existing soil base at the bottom of the raised bed.
Raised Beds, Fair Oaks Horticulture Center

If you want to improve the soil drainage and permeability of your existing clay soil, add quality compost, top the soil with several inches of mulch, and grow a cover crop. 

The Yolo County Master Gardeners put together an easy-to-understand chart of soil symptoms and possible solutions. More info is available in their online publication, "Using Soil Amendments in Yolo County Gardens."


A word of warning about one of those suggestions: adding sand, perlite or vermiculite to your soil may be counterproductive. According to retired college horticulture professor Debbie Flower, "I would not add those to my field soil: Too little sand added to clay = cement. Perlite is ugly (and it tends to rise to the surface). Vermiculite just compresses when soil is worked or walked on."

Elsewhere in that publication, they explode some of the myths about certain soil amendments: 

Myth #1. Gypsum softens clay or loosens compacted soil. 
Gypsum (calcium sulfate dihydrate) is effective in counteracting the effects of sodium, which in excess (in soil or in irrigation water) causes soil aggregates to disperse, sealing the soil surface and reducing water infiltration. The calcium in the gypsum replaces the sodium, making for more stable soil aggregates, which do not disperse and form a seal so readily. This process is the basis for the misleading claim that gypsum “loosens” the soil. Gypsum does not reduce or prevent soil compaction, dissolve hardpan, soften clay soils, or convert clay to loam. 

Myth #2. Gypsum lowers the pH of alkaline soils. 
In very high pH soils (pH > 8.5, characteristic of high- sodium soils), gypsum will lower the pH, but only slightly. At lower, though still alkaline, soil pH values, gypsum has little or no effect on pH. Chemically, calcium sulfate is a “neutral salt”, i.e., when it dissolves in water, it does not change the pH of the solution. If the objective is to lower soil pH, elemental sulfur, iron sulfate, or aluminum sulfate should be used.

Myth #3. Inoculating soil with microbes or microbial preparations, will improve “dead” or infertile soil. 
A wide variety of “microbial” products that contain (or claim to contain) microorganisms are commercially available for farm and garden use. A review of the claims made for such products is beyond the scope of this bulletin. Keep in mind that most soils, including soils that have been fertilized only with synthetic fertilizers, or have suffered years of abuse (compaction, erosion, loss of organic matter) still contain a great diversity of microbial species. To establish or re-establish a healthy soil food web, all that is needed is to apply a variety of organic amendments and ensure that pH and nutrient levels are adequate for plant growth.

More information about: 
The benefits of adding compost to the soil.
The benefits of topping garden soil with mulch.
The benefits of cover cropping.


Saturday, December 10, 2016

Garden Resolutions for the 21st Century


Back in 1991 began what became a regular early January writing staple: the newspaper garden column dedicated to "Garden Resolutions". In the years since, it's eye opening to see what has changed...and what is still the same… for backyard gardeners.

First, a look back at some of those 1991 "Garden Resolutions," items that are still worthwhile:


Hunter MP-Rotator
• Use less water. Turn off your lawn's automatic sprinklers during the winter. Install drip irrigation or micro sprayers around outdoor trees and shrubs. Don't let sprinkler water run off the grass.

•  Consider alternatives before spraying potentially dangerous chemicals. To get rid of aphids, a blast of water to the backs of leaves may work as well as applying malathion or diazinon (remember that?). Insecticidal soap can control a host of bad bugs (such as aphids, whiteflies and spider mites) without overly harming the good ones (ladybugs, praying mantids and honey bees).

If you decide to use chemical sprays:
• Use a separate sprayer, either hose-end or tank sprayer, for different tasks. Use one sprayer for herbicides (such as Roundup or any weed killers); use another sprayer for insecticides and fungicides. Gardeners can lose prized plants because they didn't rinse out an herbicide thoroughly from a sprayer before using the same unit for insect or disease control.

• Read all chemical label instructions carefully. Don't apply more of a chemical than what is called for on the label. Not only is it wasteful, but also it's more dangerous for the person applying it as well as the environment.

• And don't plant so much zucchini.
--------------------------------------------------------------------------

Now, the emphasis is still on water conservation. But the disappearance of many dangerous, non-selective garden chemicals (especially diazinon) has opened the door for other chemicals that may or may not be all they claim. Clouding that issue even further: the marketing of those products as "natural" or "safe" can mislead backyard gardeners into using something that is neither safe or “natural.” The word, “natural” by the way, has no legal standing. It does not mean “organic.” Add to that all the misinformation that is now available on the Internet, and it's no wonder gardeners are confused.


Here are some updated additions (and some oldies but goodies) for "Garden Resolutions" for the 21st Century:

• The key to plant success? The right plant in the right place.

• Get a soil test done before planting.

• Reduce the size of your lawn.
Garden Gold Miniature Peach, Oregano border

• Plant more edible ornamentals.

• Put in plants that attract pollinators and beneficial insects (birds, too).

 • Check soil moisture before watering.

• Use drip irrigation, micro sprayers or soaker hoses instead of overhead sprinklers, where it is applicable.


• Searching for reliable garden information online? Don't forget to add ".edu" into the search box at Google, Yahoo or Bing to bring up university research first. California gardeners should add the letters, “UC”, for University of California-based garden info.

• Be wary of advice on the gardening forums on the Internet. All gardening is local. What worked for a gardener back East may not work for you. Double-check your information with your local nursery person.

• Trying to control garden pests? Start with the least toxic alternative.

• Read and follow all garden chemical label directions.

Don't assume that if the chemical label says it works on Plant A, that it will also work on Plant B. Target pests and plant species will be listed on the label.

• After you have used something from the garden, use it again. Make your own compost from kitchen scraps and leaves. Make your mulch from shredded and chipped tree limbs from your own property.

• Mulch, mulch, mulch.

• And don't plant so much squash this year (some things never change). 

Monday, November 25, 2013

Citrus, Frost and Mulch: Yes or No?


I love mulch. That would be obvious to anyone who has ever talked gardening with me. Big piles, small piles, inches of mulch scattered everywhere. Love it!


The benefits of adding organic mulch (wood chips, shredded tree limbs, pine needles, compost, straw) to the top of your garden soil:
• retains moisture
• keeps soil temperature constant, reducing plant stress
• suppresses weeds
• gradually increases soil organic matter
• attracts beneficial organisms that improve soil fertility and porosity.
• Mulch encourages healthier plants, reducing the needs for pesticides and fertilizers.
• protects roots and plants from mechanical injury.
• On hillsides and around homes, it suppresses the spread of brush fires.

But a long-held recommendation from the University of California flies in the face of the "all mulch, all the time" rule regarding protecting citrus from the effects of freezing temperatures: "A cover crop or mulch can lower minimum temperature at night, posing an increased threat from freeze damage." 

So, our advice has been over the years, "rake away mulch from beneath citrus before an expected frost or freeze".

Now, the California Landscape Contractors Association is offering the opposite advice in a release regarding frost protection: "Mulching with a partially composted material is one the best ways to protect plant roots because it helps insulate the soil, reducing heat loss and minimizing temperature fluctuations. Protecting the roots is necessary in order for them to survive the cold." The CLCA also points out: "Be sure to check the mulching material about once a month to make sure that moisture is getting to the soil below. Avoid using weed block materials, plastic or other moisture barriers beneath the mulch so that water can get to the roots. You may also need to water some of the drier areas in mid-December or mid-January if you find the soil dry."

So, who's right? Sacramento County Farm Advisor Chuck Ingels says: keep on mulching!

"The CLCA is right on," says Ingels. "In our mild climate, mulch doesn’t protect the tree from cold because the soil and roots really don’t ever freeze. Mulch protects the soil for other well known reasons. Regarding that UC study: years ago I thoroughly researched this and wrote about it in "Protecting Groundwater Quality in Citrus Production". In a large orchard, the best orchard floor conditions for reducing frost hazards is bare, firm and moist soil. The sun hits the soil and re-radiates the heat at night, warming the air. Tall cover crops are worst because not only do those plants not hold much heat, but tall cover crops raise the level of cold air (cold air sinks), increasing frost damage potential."

"Perhaps with just a few citrus trees there may be some benefit in this regard," Ingels concedes. "But any difference is generally very miniscule. What happens on the surrounding five acres (asphalt vs. buildings vs. bare ground) affects the air temperature around your tree. So, mulch away!"

ROOT ROTS + MOISTURE + MULCH = TROUBLE FOR CITRUS TREES But wait a minute, here's another reason why mulch and citrus trees may not be the best of friends: phytophthora. The spread of this root and crown rot fungal disease may actually be aided by too much mulch beneath shallow rooted citrus trees, especially in moist, slow-draining soils. According to the UC Division of Agriculture and Natural Resources book, Pests of Landscape Trees and Shrubs, "phytophthora kills the roots and root crown area of infected plants...possibly causing mature plants such as citrus to grow slowly and gradually decline... Phytophthora may affect only small feeder roots or rootlets, major roots or all roots and the crown... Because mulch retards drying of the soil and excess soil moisture greatly contributes to the development of root rots, improper or excessive use of mulch may actually promote root rot development."
TO MULCH OR NOT MULCH CITRUS? A COMPROMISE.
 If your soil drains easily and is not compacted, you may be able to get away with adding a few inches of mulch beneath your entire mature citrus trees, but keep the mulch from touching the trunk; six inches away, at a minimum. But if you have clay soil, slow draining or compacted soil, or just want to play it safe, Debbie Flower, Professor of Horticulture at American River College in Sacramento, offers this advice to stave off decline in a citrus tree: place the mulch from about two feet away from the trunk to beyond the outer canopy of the tree.


For newly planted citrus, move the mulch to the outer edge of the canopy (and beyond).


This way, the shallow roots near the root crown (as well as the crown area itself) have less of a chance of getting root rot problems. 


Another strategy: plant citrus in raised beds or containers to improve drainage. And perhaps a string or two of the old style C9 Christmas lights for some added heat on frosty nights. And while you're at it, perhaps some insulating pipe wrap around the trunk.

Wednesday, September 26, 2012

Garden Tasks To Do, and NOT Do, This Fall

Columbus Day, Halloween, Veterans Day, Thanksgiving, Hanukkah, Christmas. The busy holiday season awaits. OK, maybe you aren't going to get dressed up as the "Santa Maria" and march down Main Street on October 8, but there are still enough other tasks to accomplish this time of year to dissuade you from the garden. The good news: here are some yard chores you don't have to tackle this time of year.


Don't deadhead your roses. Many Northern California rosarians are now advising rose growers to let those fading October flowers remain on the plant. This will force the rose bush to form hips, which helps the plant slow down in preparation for the January pruning season. Because cold winters are not a certainty here, roses have problems entering complete dormancy in our area. Not pruning roses now tells the plant, "Time to take a nap!"


Don't prune your shade trees until the last leaf has fallen. Then, it will be easier to gaze up into the canopy of the tree to decide which branches need to be trimmed or removed. Good reasons for pruning trees include removing or cutting back branches that are rubbing each other or the house. Low branches that impede foot traffic or suckers emanating from the base can be removed at that time, too. If you think you won't remember the dead branches that will need to be removed when all the leaves are gone, go ahead and mark those branches now with ribbon or green tree tape.

Don't Prune Citrus Trees. Lance Walheim, author of the books "Citrus" and "All About Citrus & Subtropical Fruits", says early fall is the one season to avoid taking a saw to your orange, lemon, mandarin and other citrus trees. The soil is still warm, which will push out new growth wherever you made a pruning cut. And that new growth will be more susceptible to frost damage during the late fall and winter.

Don't Prune Apricot and Cherry Trees. Apricots and cherries are susceptible to Eutypa dieback, a disease which kills branches. Infection occurs on wounds made during wet weather. You need six weeks of dry weather after pruning. Prune these trees after harvest in late spring or early summer.


And now, for you masochists, some autumn garden tasks to add to that growing list on the side of the refrigerator.


• Clean up the summer vegetable garden. Many garden pests overwinter in fallen fruit and twigs, too.

• After you've cleared out the dying summer vegetables, prepare for next year's garden by checking the soil pH. Test kits are available at just about every nursery.

 
•  Tomato hornworms are going into hibernation in the soil beneath your tomato plants. Dig down about four inches and discard their cocoons, which resemble two inch-long, reddish footballs.

• Feed your bare garden soil during the winter with a cover crop of clover, fava beans or vetch. This will add nitrogen for next year. 


Chinese Pistache
 • This is a great time for planting new trees and shrubs, especially ones with outstanding fall foliage for California. Good specimens include Japanese maples, Chinese pistache, tupelo, red oak and scarlet oak.
  
• Vegetables to plant from seed now include radish, spinach, fava beans, carrots, swiss chard, corn salad, leaf lettuce, onions and peas.

•  Despite the cooler temperatures, your lawn and garden still need about an inch of water a week. Unless the rains come, keep your automatic sprinklers operating. How much water is an inch? Here’s how to measure.

•  Cool season lawns, such as the popular fescue blends, are putting on a spurt of growth now. Mow often so that you are never removing more than a third of the total height of the grass blade.


 • Dethatch, aerate and overseed bermuda grass lawns with rye grass to keep it green all winter. At a loss of how to start? Here’s how.

•  This is a good time to plant ground covers such as low growing manzanitas, verbena and carpet bugle. This will give their root systems a chance to get established for their burst of spring growth.

• Scatter and plant tulip and daffodil bulbs outdoors for a more natural look.

• Add some indoor color for the upcoming holiday seasons by planting bulbs in containers. Your favorite local nursery has a good supply right now.

• Feed and protect rhododendron and azalea roots during the winter by adding two or three inches of mulch around those plants. More on the benefits of mulch.

• Available now at nurseries: colorful winter blooming annuals such as violas, calendulas, stock, Iceland poppies and snapdragons.

 • Temperatures dipping down below freezing can occur in many of the interior areas of Northern and Central California in early November. Prepare for that possibility by moving frost-sensitive potted plants indoors or against a west or south-facing wall.


Row covers, hot caps, and water-filled containers surrounding young vegetable seedlings offer these plants a warmer nighttime environment.


• Prepare for the rainy season by knocking down watering basins around trees.

Friday, April 1, 2011

How To Kill Your Lawn in 2 Easy Steps


1. Mow the lawn as short as possible.


2. Top the area with 12 inches of small wood chips or chipped/shredded tree limbs.


In a few weeks, you should have soil suitable for planting something other than a lawn. Preferably, putting in plants that are a lot less work, are edible and/or use less water, fertilizer and pesticides.

According to Washington State University Horticulture professor Linda Chalker-Scott:

"Double digging the soil 12 inches isn't necessary," explains Chalker-Scott on her blogsite, The Garden Professors.  She goes on: "Double digging the soil 12 inches destroys soils structure...Sheet mulches impede water and air movement.  They're not needed to keep the grass from growing through. Wood chips do this just fine on their own. And don't worry about that initial 12 inches of chips. Within a few weeks it will settle to about 8 inches. Let it sit for several weeks. Then pull aside some of the chips and take a look. If the process is done, the grass and/or weeds will be dead and decomposing - a natural compost layer. You can then plant whatever you like. Reuse the chips somewhere else in your garden."

This is not an inexpensive process, costing about $1.30 per square foot of lawn area you want to cover. For a 12-inch layer of small bark to cover 100 square feet, you would need four cubic yards of bark. In our area, that would cost you about $130, plus taxes and delivery. And that's just to cover 100 square feet!

I would be inclined to leave that mulch in place for several months, if not a full year, to make sure the lawn is dead.


Other reasons to leave that mulch on as long as possible: those small wood chips/chipped-shredded tree limbs are slowly breaking down, feeding the soil, improving the tilth (a healthy combination of nutrient-rich soil and air pores) and increasing microbial activity in the growing zone. Plus, it isn't bad to look at, either.

There is another down side to this process: 12 inches?!? That's one hell of a first step UP to your former lawn. And then your shoes get buried.

Other ways to kill a lawn: soil solarization (limited to use during the summer); and, America's most popular method to kill unwanted plants: applying glyphosate (aka Roundup). But the more you read about glyphosate, using non-chemical means to rid yourself of a lawn looks better and better.

 
No matter which lawn-killing process you use, remember Farmer Fred Rule #7: Bermudagrass is forever.


Tuesday, February 1, 2011

Garden Resolutions: Then and Now

Back in 1991, I started what became an annual event: writing a "Garden Resolutions" article each January for my weekly newspaper column. In the 20 years since, it's eye-opening to see what has changed...and what is still the same for backyard gardeners.

First a look back at that first "Garden Resolutions" column, 20 years ago:

• Use less water.  Turn off your lawn's automatic sprinklers during the winter. Install drip irrigation or micro spayers around outdoor trees and shrubs. Don't let sprinkler water puddle up and run off the grass. Keep a bucket in the shower to catch the cold water in the morning before the hot water reaches you; then, use that bucket of water for your indoor and outdoor potted plants.


•  Consider alternatives before spraying potentially dangerous chemicals. To get rid of aphids, a blast of water to the backs of leaves may work as well as applying malathion or diazinon.  Insecticidal soap can control a host of bad bugs (such as aphids, whiteflies and spider mites) without harming the good ones (ladybugs, praying mantids and honey bees). A pie plate of stale beer can do in snails. 

But, if you decide to use chemical sprays:
• Use a separate sprayer, either hose-end or tank sprayer, for different tasks. Use one sprayer for herbicides (such as Roundup or any weedkillers); use another sprayer for insecticides and fungicides. It's not uncommon for gardeners to lose prized plants because they didn't rinse out a herbicide thoroughly from a sprayer before using the same unit for insect or leaf disease control. Rince out the sprayer and nozzle three times after each use.


• Read all chemical label instructions carefully. Don't apply more of a chemical than what is called for on the label. Not only is it wasteful, but it's more dangerous for the person applying it as well as the environment. 


• Enjoy gardening in 1991. Don't let the work involved sour the experience. Remember what awaits you this year for your efforts: the beauty of the first tulip or marigold, the taste of that first homegrown tomato and the bounty of a seemingly endless supply of summertime zucchini.


• And don't plant so much zucchini this year.
--------------------------------------------------------------------------

In 2011, the emphasis is still on water conservation. 
But the disappearance of many dangerous, non-selective garden chemicals (especially diazinon) has opened the door for other chemicals that may or may not be just as harmful. Clouding that issue even further: the marketing for those products as "natural" or "safe" can mislead backyard gardeners into using something that is neither safe or natural (organic). Add to that all the misinformation that is now available on the Internet, and it's no wonder gardeners are confused. 

(note to kids: yes, there was an Internet in 1991, but it was limited to services that were primarily text services that were e-mail and bulletin-board based, such as Prodigy, CompuServe and Delphi. Ask your parents about CompuServe. It was the cat's meow!)


Here's the 2011 list of "Garden Resolutions":

• The key to plant success? The right plant in the right place. Get a soil test done. Read up on plant requirements before purchasing them.

• Reduce the size of your lawn.

• Plant more edible ornamentals.


• Put in plants that attract pollinators (insects and hummingbirds) and beneficial insects (and birds).


 • Check soil moisture before watering.


• Use drip irrigation, microsprayers or soaker hoses instead of overhead sprinklers, where it is applicable.


• Searching for reliable garden information online? Don't forget  to add ".edu" into the search box at Google, Yahoo or Bing to bring up university research first.

• Be wary of advice on the gardening forums on the Internet. All gardening is local. What worked for a gardener back East may not work for you. 

• Just because it is on the Internet doesn't make it The Truth. Check their information sources.

• Trying to control garden pests? Start with the least toxic alternative. Consider mechanical, physical and cultural controls before choosing chemicals.


• When choosing garden chemicals, don't believe the advertising. Believe and follow the fine print on the chemical label.


• After you have used it, use it again. Make your own compost from kitchen scraps and leaves. Make your mulch from shredded and chipped tree limbs from your own property.


• Mulch, mulch, mulch. 


• And don't plant so much zucchini this year.
(some things never change.) 


Add your 2011 Garden Resolutions!

Thursday, January 6, 2011

Bare Root Fruit Trees: Choosing and Planting


What is a bare root fruit tree? A young fruit or nut-bearing deciduous tree, offered for sale in the winter. “A stick with roots”. Fruits include apples, apricots, apriums, cherries, figs, mulberries, peaches, pears, persimmons, plums, pluots, nectarines and pomegranates. Nut varieties are also available bare root in the winter, including walnuts, almonds, pistachios, filberts, chestnuts and pecans. Vine and bush fruits are also for sale in the winter, including blueberries, grapes and kiwi. Citrus is an evergreen plant, available year round.
 
Why grow your own fruit? For better health and better taste. Nothing beats the taste of home grown fruit! What follows are some tips for

turning this...


 Into this!                                                                                                Or this!
 

Shop local.
Your local nurseryperson knows your soil and growing conditions, and will carry fruit tree varieties that will do well in your area. Of those, choose fruit trees that you enjoy! Wondering which ones taste the best? Master fruit tasters have their favorites listed online, at davewilson.com, a wholesale grower of fruit and nut trees. Consider getting several trees that will ripen at different times.

Before You Buy, Plan Ahead.
Fruit trees do best in a sunny location with good drainage. They need eight or more hours of sun. Six hours of sun is pushing your luck. Wet soils are a major cause of fruit tree failure. 

 
If that hole you dug doesn’t drain within 24 hours, build a raised bed, at least 4’ x 4’x 12-16” high. Cherries and apricots need the best drainage for success. The fruit trees most tolerant of slow-draining soils are apples and pears.

Don’t be too concerned about a crooked top. After you plant a three to five foot tall bare root fruit tree, you can cut it off at knee-height. That way, the fruit-bearing branches will be lower, within easy reach. If you don’t let the tree get taller than seven feet, that fruit will ALWAYS be easy to reach.

Pay attention to the bud union. This is the spot where the tree variety is attached to the rootstock. It should be straight, not bent.

Look at the roots. They should not be brittle, damaged or cracked.

Walk away from bare root trees that:

• Have tunneling around the bud union (they might be borers).
• Oozing, dark colored bark (might be bacterial canker).
• Have been at the nursery for more than two years, if they are in containers. If in doubt, ask the nurseryperson.

When you get the tree home:
Treat it nice, immediately. Don’t let the roots dry out. If you are going to plant later that day or the next day, place the tree in a bucket of water or cover with a wet blanket. If it is going to be several days before you plant, bury the roots into soil (“heeling in”). This can be in your garden soil, compost, potting soil, or even a pile of wet leaves.

Dig a $50 Hole for that $20 Tree.

The hole should be wide, not deep. About four feet wide and as deep as the rootstock portion of the tree. Loosen the six feet of surrounding soil outside the hole to that depth. Feeder roots travel outward, not downward.

Plant the Tree Correctly.
Set the tree on a slight mound in the middle of the hole, and gently coax the roots to face outward. Look for  a color change on the tree below the bud union; the tree should be planted no deeper than that. Ideally, plant the tree with that mark about an inch above the existing soil line to allow for settling. Set your shovel handle across the hole to determine that point. Use only the soil that came with the hole.

Top With Mulch. After planting, surround the tree with three or four inches of organic mulch; the mulch should extend out several feet. Mulch feeds the soil, suppresses weeds, cools the soil in the summer and helps maintain even moisture, too. Don’t let mulch touch the trunk, though. That can lead to rot problems.

Fertilize?
Wait until the tree is actively growing, choosing a fertilizer that lists fruit trees on the label. Whichever fertilizer you use, read and follow label directions.

Add Water. Carefully.
The primary cause of fruit tree failure is poor irrigation: either too much or too little water. Use a moisture meter or a soil auger to determine how wet or dry the soil is at root level. Or, grab a handful of the soil at a depth of 8 to 10 inches to determine how wet the soil is. Start doing this when that new fruit tree begins to flower. And, do it before you water.

  
Give the tree some sunburn protection. Paint that bare stick with a 50-50 mix of interior white latex paint and water; or, purchase tree whitewash at a nursery. That new tree is very susceptible to sunburn, which can lead to a cracked trunk…an entry point for insect and disease problems. 

In a few years, with a little bit of care, your kitchen counter will be overflowing with homegrown, healthy fruit.


Monday, December 13, 2010

Mulch under Citrus Trees: Pros and Cons


I love mulch. That would be obvious to anyone who has ever talked gardening with me. Big piles, small piles, inches of mulch scattered everywhere. Love it!


The benefits of adding organic mulch (wood chips, shredded tree limbs, pine needles, compost, straw) to the top of your garden soil:
• retains moisture
• keeps soil temperature constant, reducing plant stress
• suppresses weeds
• gradually increases soil organic matter
• attracts beneficial organisms that improve soil fertility and porosity.
• Mulch encourages healthier plants, reducing the needs for pesticides and fertilizers.
• protects roots and plants from mechanical injury.
• On hillsides and around homes, it suppresses the spread of brush fires.

But a long-held recommendation from the University of California flies in the face of the "all mulch, all the time" rule regarding protecting citrus from the effects of freezing temperatures: "A cover crop or mulch can lower minimum temperature at night, posing an increased threat from freeze damage." 

So, our advice has been over the years, "rake away mulch from beneath citrus before an expected frost or freeze".

Now, the California Landscape Contractors Association is offering the opposite advice in a release regarding frost protection: "Mulching with a partially composted material is one the best ways to protect plant roots because it helps insulate the soil, reducing heat loss and minimizing temperature fluctuations. Protecting the roots is necessary in order for them to survive the cold."

So, who's right? Sacramento County Farm Advisor Chuck Ingels says: keep on mulching!

"The CLCA is right on," says Ingels. "In our mild climate, mulch doesn’t protect the tree from cold because the soil and roots really don’t ever freeze. Mulch protects the soil for other well known reasons. Regarding that UC study: years ago I thoroughly researched this and wrote about it in "Protecting Groundwater Quality in Citrus Production". In a large orchard, the best orchard floor conditions for reducing frost hazards is bare, firm and moist soil. The sun hits the soil and re-radiates the heat at night, warming the air. Tall cover crops are worst because not only do those plants not hold much heat, but tall cover crops raise the level of cold air (cold air sinks), increasing frost damage potential."

"Perhaps with just a few citrus trees there may be some benefit in this regard," Ingels concedes. "But any difference is generally very miniscule. What happens on the surrounding five acres (asphalt vs. buildings vs. bare ground) affects the air temperature around your tree. So, mulch away!"


ROOT ROTS + MOISTURE + MULCH = TROUBLE FOR CITRUS TREES
But wait a minute, here's another reason why mulch and citrus trees may not be the best of friends: phytophthora. The spread of this root and crown rot fungal disease may actually be aided by too much mulch beneath shallow rooted citrus trees, especially in moist, slow-draining soils. According to the UC Division of Agriculture and Natural Resources book, "Pests of Landscape Trees and Shrubs", "phytophthora kills the roots and root crown area of infected plants...possibly causing mature plants such as citrus to grow slowly and gradually decline... Phytophthora may affect only small feeder roots or rootlets, major roots or all roots and the crown... Because mulch retards drying of the soil and excess soil moisture greatly contributes to the development of root rots, improper or excessive use of mulch may actually promote root rot development."


TO MULCH OR NOT MULCH CITRUS? A COMPROMISE.
 If your soil drains easily and is not compacted, you may be able to get away with adding a few inches of mulch beneath your entire mature citrus trees, but keep the mulch from touching the trunk; six inches away, at a minimum. But if you have clay soil, slow draining or compacted soil, or just want to play it safe, Debbie Flower, Professor of Horticulture at American River College in Sacramento, offers this advice to stave off decline in a citrus tree: place the mulch from about two feet away from the trunk to beyond the outer canopy of the tree. 


For newly planted citrus, move the mulch to the outer edge of the canopy (and beyond). 


This way, the shallow roots near the root crown (as well as the crown area itself) have less of a chance of getting root rot problems. Another strategy: plant citrus in raised beds to improve drainage.