Showing posts with label drip irrigation. Show all posts

Tuesday, May 7, 2019

Growing Tomatoes in Containers

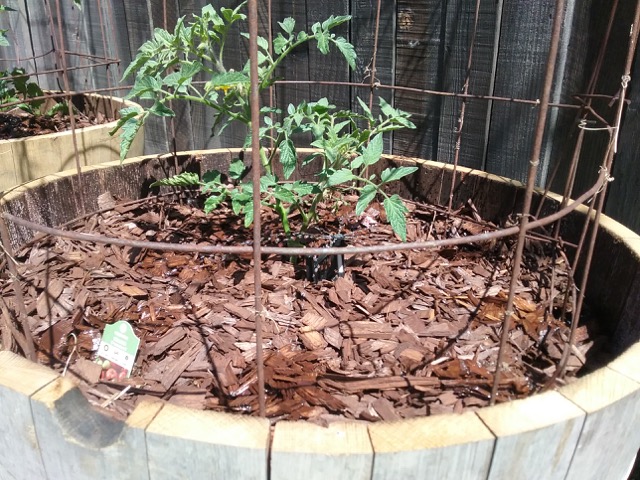
This year’s Great Tomato Growing Experiment: is this small area (4’x16’), adjacent to a north-facing fence, truly the sunniest spot on the property?

After monitoring my entire full sun-deprived Folsom yard for nearly three years, this one spot, near the garage, may be the one area that gets more than eight hours of direct sun a day, perfect for growing tomatoes.

The dilemma (well, two dilemmas, actually): because it is a concrete surface, the tomatoes must be grown in containers; and, how do you avoid water stains on the concrete when the barrels drain?

Solution: use a big container (in this case, half barrels with five 7/8” drain holes drilled through the bottom) and place that container on top of a catch basin with several 3/4” holes drilled on the side rim on the back side, allowing the water to drain from the catch basin to the  12” wide gravel area along the fence line.


The prototype catch basin was at the suggestion of radio guest Lori Ann Asmus, who decorates Christmas trees professionally (you can see her work during the holiday season at various lobbies in public buildings, including the downtown Sacramento’s Citizen Hotel).
The catch basins were, in reality, meant for placing beneath Christmas trees to catch any water overflowing the tree holders. They are available wherever fine Christmas tree accessories are sold (such as Emigh Hardware, in December).

The barrel/catch basin combo have shims under the front side, allowing a gentle slope towards the fence, coaxing the water to go out the back side of the holes in the catch basin and into the gravel. So far, so good.

Regarding the container dilemma: when planting thirsty summer vegetables in full sun, try to use the largest containers, preferably made out of something that doesn’t allow heat build-up, such as plastic (it’s not unusual for the soil in an unprotected plastic pot in full sun to reach temperatures in excess of 140 degrees on a day in the upper 90’s). A wood barrel works perfect for that purpose. Plus, the greater volume of soil in a barrel (as opposed to a 15-gallon plastic pot) also helps the plant avoid stress from dried-out soil if you miss a watering during 90 and 100-degree days. And, more soil means more room for root development.

Because a container plant may need water every day in the summer, I’ve given these two tomato plants (a Champion 2 full size tomato and a very popular grape tomato I have never tried before, Juliet) their own watering system: a battery operated timer on a nearby faucet with a Y-adapter. Connected to the timer is a short, half-inch drip line run, going along the backside of the barrels.

Connected to the half inch line: quarter inch tubing snaked through a small hole on the lower backside of the barrel, and topped off with an adjustable drip bubbler/sprinkler in the middle, which sends out 6 or 8 even streams of water in a circle. Unfamiliar with drip irrigation systems? Entire kits are available, such as this.

https://amzn.to/2DSusag


Pro tip: run the quarter inch line in the barrel BEFORE filling it with a good quality potting soil. (By the way, “Pro Tip” = “lesson learned the hard way”).


The tomato cages are made from 4’x5’ sheets of concrete reinforcement wire, 6” mesh (for easy reaching of the tomatoes). Bend the sheets in a circle and fasten with plastic zip ties. Or, use your barbed wire tool (what? everyone doesn’t have a barbed wire tool?) to cut off the vertical 12-gauge wire ends on one side, and then bend the free horizontal wires around the opposite side.

Watering containerized plants is tricky, and must be increased or decreased more frequently, depending on the weather. Having a nearby faucet/timer/drip system in place helps ease those adjustments.

Fertilization can also be tricky. Because of the leaching nature and frequent watering that an easy-draining potting mix needs during the summer, fertilizers must be applied more frequently. Note that “frequently” does not mean “more fertilizer”. If, for example, the directions on your slow-release vegetable fertilizer package advises fertilizing with a certain dosage once a month, modify it to meet the needs of your container plant: cut the dosage in half, and apply every other week.
Don’t forget that topping that containerized plant with a few inches of a bark mulch can help maintain soil moisture on a hot day and also keep the soil temperature moderate.

Saturday, December 16, 2017

3 Tips for Easier Gardening

As Grandpa Wicka used to say while repairing the tractor at the family farm outside Wibaux, Montana: "Education Costs Money." And that includes your garden education, as well. Here are three tips that took awhile (and not a few dollars) for me to learn:


Buying a wheelbarrow?  Replace that inflatable tire with a foam filled tire. Yes, that foam-filled tire/wheel combination may set you back an extra $35-40, but you will never again have to worry about a flat tire. Or purchase new inner tubes. Or buy that gooey "fix-a-flat" stuff. Or spend your first ten minutes in the garden each day with the air pump. This goes double for any gardener with an extensively thorny berry patch, where wheeling that barrow can easily cause punctures.

Shopping for garden pruners? Buy quality pruning equipment, and shop at a store that also carries replacement parts for those pruners. That is also true when choosing any sort of garden cutting device, including needle-nose nippers (for cut flowers, fruits, vegetables), pruning hand saws, bow saws, loppers and chain saws. And don't base your purchase on brand name alone. Felco, Corona, Fiskars and other manufacturers do make high quality (and high priced) pruners. But they also may produce inexpensive lines of pruners for the big box stores and chain stores. 

For example, that $10 bypass pruner by Fiskars may not have replaceable blades, a replaceable latch or even the ability to disassemble the unit for cleaning, sharpening and oiling. But the $50 bypass pruners from Felco do have a removable nut so that you can replace and clean the blades, as well as being a better design that may be more comfortable for extended use. The cheaper models might last a year; a good hand pruner by Felco or Corona can last a lifetime, with proper care. One of my favorites is the Felco F-7 (pictured below, on the left). It has a rotating handle that eases the strain on the fingers and hand during a long day of pruning.

One other tip: for general pruning chores, choose bypass hand pruners instead of anvil pruners. Anvil pruners crush the stem, and can leave a messy cut that may invite pests and disease if that branch is alive. Anvil pruners are fine for your cut flower garden (sealing the moisture in the stem until you get the flowers into a vase of water) or for removing completely dead branches. For more information (and some rather stern opinions from local gardening experts), here's a link to more about Anvil vs. Bypass pruners.


When choosing your first drip irrigation system, buy it from a store that's going to be in business for a long time. That store will be your best source for add-ons and replacement parts for your particular system. An irrigation supply store is the best place to shop. Or, choose a reputable online irrigation store, such as Dripworks, based in Willits, California. 
There is no uniformity among manufacturers when it comes to their "half-inch tubing" sizes. The outside diameter of that half-inch mainline drip tubing can range from .620 to .710, depending on the manufacturer. Which means that shopping for fittings, especially couplers, can be a a daunting experience if you're shopping at a different store. The good news: there are universal couplers available that are adjustable to fit most half inch tubing. The bad news: in my experience, they break down after too many years in the sun. Bury them under some mulch for a longer life.

A tip: Not sure what size fitting you need for your drip line? Take a piece of your existing half inch tubing with you to the store, to make sure that the fittings (couplers, tees, elbows) you purchase will, indeed, fit. 

Another tip: note the color on the ends of the couplers, tees, and elbows that you already own and use. Buy the same color when shopping for more of those parts.

One more tip: Shopping for drip fittings and you don't have that spare piece of half-inch pipe with you? Let your finger be your guide. Go out to the garden. Stick your little finger into the opening of one of your existing couplers, tees or elbows. How far does your little finger slide in? Remember that point on your finger, and then you can shop for couplings by "trying them on". Another good reason to always carry hand sanitizer: it might help you get those couplings off your finger if they get stuck.

Saturday, December 10, 2016

Garden Resolutions for the 21st Century


Back in 1991 began what became a regular early January writing staple: the newspaper garden column dedicated to "Garden Resolutions". In the years since, it's eye opening to see what has changed...and what is still the same… for backyard gardeners.

First, a look back at some of those 1991 "Garden Resolutions," items that are still worthwhile:


Hunter MP-Rotator
• Use less water. Turn off your lawn's automatic sprinklers during the winter. Install drip irrigation or micro sprayers around outdoor trees and shrubs. Don't let sprinkler water run off the grass.

•  Consider alternatives before spraying potentially dangerous chemicals. To get rid of aphids, a blast of water to the backs of leaves may work as well as applying malathion or diazinon (remember that?). Insecticidal soap can control a host of bad bugs (such as aphids, whiteflies and spider mites) without overly harming the good ones (ladybugs, praying mantids and honey bees).

If you decide to use chemical sprays:
• Use a separate sprayer, either hose-end or tank sprayer, for different tasks. Use one sprayer for herbicides (such as Roundup or any weed killers); use another sprayer for insecticides and fungicides. Gardeners can lose prized plants because they didn't rinse out an herbicide thoroughly from a sprayer before using the same unit for insect or disease control.

• Read all chemical label instructions carefully. Don't apply more of a chemical than what is called for on the label. Not only is it wasteful, but also it's more dangerous for the person applying it as well as the environment.

• And don't plant so much zucchini.
--------------------------------------------------------------------------

Now, the emphasis is still on water conservation. But the disappearance of many dangerous, non-selective garden chemicals (especially diazinon) has opened the door for other chemicals that may or may not be all they claim. Clouding that issue even further: the marketing of those products as "natural" or "safe" can mislead backyard gardeners into using something that is neither safe or “natural.” The word, “natural” by the way, has no legal standing. It does not mean “organic.” Add to that all the misinformation that is now available on the Internet, and it's no wonder gardeners are confused.


Here are some updated additions (and some oldies but goodies) for "Garden Resolutions" for the 21st Century:

• The key to plant success? The right plant in the right place.

• Get a soil test done before planting.

• Reduce the size of your lawn.
Garden Gold Miniature Peach, Oregano border

• Plant more edible ornamentals.

• Put in plants that attract pollinators and beneficial insects (birds, too).

 • Check soil moisture before watering.

• Use drip irrigation, micro sprayers or soaker hoses instead of overhead sprinklers, where it is applicable.


• Searching for reliable garden information online? Don't forget to add ".edu" into the search box at Google, Yahoo or Bing to bring up university research first. California gardeners should add the letters, “UC”, for University of California-based garden info.

• Be wary of advice on the gardening forums on the Internet. All gardening is local. What worked for a gardener back East may not work for you. Double-check your information with your local nursery person.

• Trying to control garden pests? Start with the least toxic alternative.

• Read and follow all garden chemical label directions.

Don't assume that if the chemical label says it works on Plant A, that it will also work on Plant B. Target pests and plant species will be listed on the label.

• After you have used something from the garden, use it again. Make your own compost from kitchen scraps and leaves. Make your mulch from shredded and chipped tree limbs from your own property.

• Mulch, mulch, mulch.

• And don't plant so much squash this year (some things never change). 

Wednesday, June 19, 2013

Drip Irrigation: How Long Do I Water?

     90% of all plant problems are water related, either too much or too little. Compounding the problem: gardeners who are operating a drip irrigation system but using a sprinkler mentality.

     Callers to the radio show, after describing a plant problem will be asked: "How are you watering that plant?" More often than not, if the answer is, "drip irrigation", they will follow that with, "And I run it for five minutes a day, everyday."
And therein lies the problem.

     A drip irrigation system puts out water much slower than a sprinkler system, usually a gallon or two an hour versus a sprinkler system's output of a gallon or two A MINUTE.

     In five minutes, a 1 gallon per hour (gph) drip emitter will put out about 10 ounces of water...slightly more than a cupful. Not only will that pittance of water not saturate the width of the plant's root zone (which can extend beyond the canopy of the plant), it won't penetrate more than an inch or two. And then not stay there very long.

     What happens to a plant with a shallow watering program? The roots stay very near the surface, where they are more subject to drying out quickly. This boom and bust cycle stresses the plant, opening up the possibility of disease and insect invasions.

     With a drip irrigation system, don't think "minutes". Think: "hours". And water deeply, but infrequently (once or twice a week).  

Your goal is to apply enough water to penetrate the soil to a depth of at least 8 inches, preferably more. The day after you water, either dig down 8 inches by hand or with a soil sampling tube; or, stick a moisture meter down to that depth to determine if the soil is moist (not dry, and not soggy). Battery-operated soil moisture meters (such as the yellow one, pictured on the right) tend to have a longer life.

In our raised bed vegetable garden, the summer watering regimen is with an inline drip irrigation system (1 gph emitters along the line, spaced 12" apart) which is run twice a week, six hours at a time. Your weather, soil type, slope and crops may need a slightly different watering schedule. In our 4'x20' raised beds, three inline emitter lines run the length of each bed. The lines are spaced 18" apart.

Consider using microsprinklers or sprayers to thoroughly wet the root area for trees and shrubs. These put out more water, usually between 8 and 20 gallons per hour. We have these on our shrubs and fruit trees, and during the summer will run them for about an hour, once or twice a week, depending on how hot it is.

     The other part of the drip irrigation equation that a lot of gardeners miss: not enough emitters for the plant. Placing one emitter next to a new tree or shrub is not enough. Remember, plant roots tend to grow out horizontally. Emitters should be spaced evenly around the tree or shrub, in a circle, halfway between the trunk and the outer canopy of the newly installed plant. The spacing between the emitters will depend on your soil type: for sandy soils, use a 12" spacing; for heavy clay, 18-24" spacing. Add emitters towards the outer canopy of the plant as the plant grows.


• Soaker hoses need maintenance, too. Flush them monthly. The Dramm soaker hose, pictured here, is the most reliable, even-flowing soaker hose I have ever used.


A great online tutorial of drip irrigation: the Dripworks website. This site has helpful tips and videos that can help beginner and pro alike solve their drip irrigation and yard watering woes.

     The Dripworks catalog is also great resource for anyone tackling the problems associated with drip irritation...uh, irrigation. Just thumbing through the catalog can give you several "Aha!" moments for improving your own yard watering procedures, especially if you are looking to replace your residential sprinkler systems with a drip irrigation system, which can work with your existing automatic sprinkler system control box.


Wednesday, July 6, 2011

Wilting Plants? Check Soil Moisture Before Watering


Improper watering is the number one cause of plant failure. Knowing how wet the soil is at the root level can help you keep your plants healthy

Keep in mind: different plants have different watering needs. Learn those needs, then group plants together with similar watering requirements when designing your landscape. The Sunset Western Garden Book is a good source for that information.

Signs of not enough water at the root level of plants: 
Wilted leaves in the morning. Wilted leaves in the afternoon.
Wilted leaves in the evening.
Red-brown margins of leaves.
Premature fall color of leaves.
Growth reduction.
Leaf drop.
Branch dieback.


Signs of too much water (also called aeration deficit) at the root level of plants:
The soil has a foul smell, like rotten eggs.
Soil is a blue-gray color.
Yellowing, wilting and/or dropping of leaves.
Limited new growth.
Small, corky outgrowths on the undersides of leaves.


Be warned, though: sometimes, symptoms of overwatering and underwatering can be the same (such as leaf wilting). And, symptoms of soil water problems may actually be another problem...that was caused by your watering regimen! Root rots, for example, thrive in saturated soils.


Frequent, light watering leads to shallow rooting, increasing the chances of plant problems.


Regarding droopy leaves on a hot afternoon: there are two schools of thought.
One school says plants conserve moisture on a hot afternoon by allowing their leaves to sag.

The other school says: don't believe them. Drooping leaves are usually indicative of a lack of water from the root zone. "Large, thin leaves, common in many of ornamental, annual and vegetable species, do not conserve water," writes Washington State University Horticulture Professor Linda Chalker-Scott. "Tomatoes, zucchini and black-eyed Susans...are not water conservers. Chronic wilting of these and others can eventually cause leaf tip and margin necrosis (or tissue death). It also reduces growth, so that your yield of tomatoes, zucchini and black-eyed Susans will be decreased."
She advises applying a layer of mulch around those plants to help conserve water. 

Also, check the moisture at the root level before watering.
  

To determine the amount of water at the root level:

• A day or two after watering, dig down 8 to 10  inches with a trowel or small shovel, near the drip line (outer canopy) of the plant. Doing this in two or three spots would be more helpful.

• At that depth, grab a handful of the soil. Squeeze that handful. If it is muddy and watery, reduce your watering for plants that require regular (but not frequent) irrigation. If it is so dry you cannot form a clod in your hand (it turns to dust instead), increase your watering (for those plants that require moderate amounts of water).

• If you can form a dirt clod in your hand, yet break it apart with a little effort, that is probably the correct soil moisture for your plant.


• Steve Zien, owner of the Citrus Heights-based organic landscaping consulting service, Living Resources, recommends the use of a soil sampling tube to determine the moisture at root level. "Just press the tube down six to eight inches into the soil after you are done watering," says Zien. "When you bring it back up, the open slot along the side of the tube will let you see if the soil at that depth is wet, moist or dry. Adjust your watering time so that the soil sample is moist, not too wet or dry."


• An easier, but more unreliable way to measure the water content of the soil: purchase an inexpensive (under $10) moisture meter, available at most nurseries. Test its accuracy by putting its probe into a glass of water. If the probe does not read "wet", choose another. Expect it to function for only a year or so.


Battery operated moisture meter probes may set you back a few more dollars, but in my experience - with proper care (clean them after each use, don't leave them outdoors) - they will last many years.


• Extended, infrequent, slowly applied irrigation is the most efficient watering method. Soaker dripline or drip irrigation systems work best. Here in the Central Valley, foothills and Bay Area, run them for 3 to 6 hours at a time, twice a week, in the summer. This is only a guideline to get you started. Adjust that timing to your particular soil type and plants.

• And, don't forget: add more drip emitters and drip lines as the plant grows, especially for trees and shrubs. Make sure to get water to the outer canopy of the plant (and beyond) where the roots travel.


How much water does your lawn need? 
Some tips from the UC Integrated Pest Management Website:


• Avoid planting turf species that require frequent watering, such as bluegrass or ryegrass.
• Design your landscape to minimize water runoff onto hard surfaces and into storm drains.
• To reduce runoff, install non-irrigated buffer areas, which include water-efficient plants or permeable features, next to sidewalks or on slopes.
• Aerate heavy or compacted soils, so water can easily move down to reach grass roots.
• Install an irrigation system that you can adjust to properly water areas of your landscape that have different requirements.
• Water only when your lawn needs it.
• Water requirements vary according to turf species, location, and month of the year.
• Most lawns need water when the top 2 inches of soil have dried out.
• Shady and sunny areas and different soil types will have different water requirements.
• Deeper, less frequent watering is best for most lawns. Water only 2 to 3 times a week.
• Make sure your sprinkler system isn’t producing runoff, especially on slopes. If you see runoff, use shorter watering times and repeat the cycle to allow time for the water to move into the soil.
• Water early in the morning when evaporation and wind are minimal.
• Adjust your watering schedule seasonally, and shut off your irrigation system during rainy weather.


And, the video: How Much Water Do Your Plants Need?

Monday, February 21, 2011

Go Green in the Yard and Garden...Before You Have To

Ever hear of WELO? No? You will, if you plan to do any landscaping. California passed the Water Efficient Landscape Ordinance in 2009, requiring all water suppliers to increase water use efficiency...by limiting the amount of water you use.

The ordinance (41 pages long) is still going through the bureaucratic swamp of local governments and water agencies, but it will happen.


• Public landscapes and private development projects including developer-installed single family and multi-family residential landscapes with at least 2500 sq. ft. of landscape area are subject to the Model Ordinance.

• Homeowner-provided landscaping at single family and multi-family homes are subject to the Model Ordinance if the landscape area is at least 5000 sq. ft.

• All new landscapes will be assigned a water budget.

• Landscapes will need an approved design plan, an irrigation design plan, grading design plan and maintenance schedule.
Basically, if it uses water, it will need approval, outdoors and indoors. 

It may be years before this ordinance is fully implemented, but if there is a yard and garden rehab in your near future, you may want to consider some of these preemptive steps to keep the water police away in the future:

Use Native & Mediterranean Plants

Native and Mediterrranean climate plants are already accustomed to much of California’s unique climates. These plants require little water, little fertilizer and very little care. And will become very popular after WELO is fully implemented. The horticultural staff of the UC Davis Arboretum have identified 100 Arboretum All Star plants.  These plants are tough, reliable plants that have been tested in the Arboretum, are easy to grow, don’t need a lot of water, have few problems with pests or diseases, and have outstanding qualities in the garden. Many of them are California native plants and support native birds and beneficial insects.

Know Your Soil  
Will that plant thrive in your soil’s pH? Does your soil really need more nitrogen, phosphorus or potassium?
Do a soil test before adding any fertilizer (a soil test is part of WELO approval).

Use Pesticides & Fertilizers Properly and in the Right Amounts 

"If a little is good, then more is better". That’s definitely not the mentality to use when it comes to pesticides and fertilizers. Always follow the manufacturers instructions when it comes to application methods and amounts.  Be particularly careful not to over water your lawn or landscape after applying pesticides and fertilizers. Remember, everything that goes down the storm drain eventually leads to a river. (Yes, prohibiting water runoff - which might contain excess fertilizer or pesticides - is part of the WELO model ordinance).  

Before Using Any Pesticide, Try These  
Use cultural, physical or mechanical means to control pests. “Cultural” means: matching the plant with your yard’s conditions: sun, water and soil. Healthy plants can stave off pests and diseases better. “Physical” controls: a row cover, for example, to keep aphids and whiteflies off a young vegetable garden. “Mechanical”: a blast of water from a jet nozzle on a garden hose can dislodge aphids from rose bushes, for example ("Just make sure that nozzle has an on-off valve," admonishes Officer WELO).

Use Less-Toxic and Non-Toxic Pesticides
Keep your kids and pets safe by using non-toxic and less-toxic pesticides in the home landscape and garden. Put in plants that attract beneficial insects. These days, there are a lot of effective non-toxic and less-toxic pesticides for sale at your local nursery or home improvement center. Know the signal words on pesticide products: Caution (least toxic)-Warning-Danger (most toxic).

Use Organic Fertilizers

There are many organic fertilizers available at your local local nursery. These fertilizers range from steer and chicken manure to fertilizer blends made from natural materials and targeted towards different plant categories such as roses or vegetables. Organic fertilizers tend to release nutrients slowly and feed plants over a longer period of time than synthetic chemical fertilizers. Organic fertilizers may also help to amend poor soils by encouraging beneficial microbe populations in the soil, improving drainage and reducing runoff (WELO Points!)
Synthetic chemical fertilizers give plants a jolt of instant nutrition but there are downsides to that, including weaker growth that is more attractive to pests. Synthetic chemical fertilizers can burn plants if not used properly, may build up salts in the soil over time and can also produce new vegetative growth quickly that the plants root system may not be able to adequately support.

Compost
Stop throwing away kitchen scraps and improve your soil by starting a compost pile or worm bin.

Mulch 
WELO says: "A minimum two inch (2″) layer of mulch shall be applied on all exposed soil surfaces of planting areas except in turf areas, creeping or rooting groundcovers, or direct seeding applications where mulch is contraindicated." Mulch conserves water by keeping the soil evenly moist; reduces herbicide use because weeds have a harder time popping up through the mulch; reduces fertilizer use; feeds the soil by addiing organic matter that feeds the beneficial soil organisms. Mulch improves the soil by preventing soil compaction while increasing the tilth (soil structure).
  
Get in the Habit Now: Watch the Watering
Check your irrigation system every month or so to make sure that you are indeed watering your landscape and not the sidewalk or your neighbor’s car. Take care of any irrigation issues such as broken spray heads promptly. Use a moisture meter to help you determine when and how much to water your landscape.
 WELO's approved watering hours are 8 p.m.-10 a.m.).

New Lawn Sprinklers Use Less Water  
Replace old spray and impulse sprinklers with new models that use 30% less water. And maybe swap out sprinkler systems that are watering small areas. WELO says: "Narrow or irregularly shaped areas, including turf, less than eight (8) feet in width in any direction shall be irrigated with subsurface irrigation or a low volume irrigation system."

Rain Barrels
Every home should have at least one rain barrel system, if not three or four. If  100,000 homes were to have just one 55 gallon rain barrel, it would save 5.5 million gallons of water every year. WELO says: "Rain gardens, cisterns, and other landscape features and practices that increase rainwater capture and create opportunities for infiltration and/or onsite storage are recommended." 

Grasscycle

Ditch the bag and grasscycle with a mulching mower. It’s easy, keeps your lawn looking great and best of all - no more heavy bags of grass clippings to dispose of. Mulching mowers, however, are not mandated by WELO. Yet.

Reduce the size of your lawn. 
WELO will nudge you in that direction: "Turf is not allowed on slopes greater than 25% where the toe of the slope is adjacent to an impermeable hardscape." Then, choose turf species that use less water. Blends that include certain fescues or bentgrass require 50% less water.
 
The Our Water, Our World Program 
is a program that helps to identify non-toxic and less-toxics methods of pest eradication.  The Our Water, Our World program distributes information sheets on effective pest control and uses special shelf labels to help customer identify of non-toxic and less-toxic pesticide choices. http://www.ourwaterourworld.org/

The Master Gardener Program
is a program that is under the University of California Cooperative Extension that is designed to assist residents with landscape and gardening issues. The Master Gardener’s IPM or Integrated Pest Management program features tons of information how to deal with pests, diseases and fungus effectively. 

 =========================================
By the way, the WELO Model Ordinance is just a foundation for even more draconian watering rules in California. From the WELO FAQ:
"Can we make our local ordinance more stringent?"
"Yes, due to water supply conditions, climate and other factors, a local agency may make any provisions in its local ordinance more stringent than the Model Ordinance (option #2). For example, a local ordinance may further reduce the ET Adjustment Factor, limit turf grass area, use plant lists, or have specific fire prevention requirements. These will be determined by the local agency."


Monday, July 5, 2010

Tomato Troubleshooter: 2010 Update


Tomatoes - and tomato plant problems - abound this time of year. And 2010 is turning out to be an especially vexing year for tomato growers here in California, due to our cool, wet spring. And now that the summer heat has returned, many tomato problems have returned to the forefront of gardeners' attention. 

Good sources of information to help you solve your tomato travails are the books from the University of California Division of Agriculture and Natural Resources, "Pests of the Garden and Small Farm" by Mary Louise Flint and "The California Master Gardener Handbook," edited by Dennis Pittenger.

These books take an integrated pest management approach to solving plant woes. Instead of first reaching for harsh chemical controls, the books suggest adopting cultural, physical, mechanical and less toxic methods to solve the problems. Some of these solutions border on common sense, such as not planting tomatoes in too much shade; ripping out and destroying problem plants; or, trapping snails or earwigs at night beneath boards, then destroying them the following morning. 

Here are a few of the tomato problems you've been asking about this year, along with possible solutions, that can be found in greater detail in those publications:

Sunscald
Symptoms: Tomato fruit turns light brown and leathery, on side exposed to sun. 
Possible culprit: Sunscald (sunburn). 
Solution: Don't prune leaf cover from plant. Keep plant vigorously growing to produce more leaves.


SOLAR YELLOWING. According to the  UC Davis, Vegetable Research and Information Center , the reason for the yellow or yellow-orange color, rather than the normal red, is that the red pigment (lycopene) fails to form above 86 degrees (F). This phenomenon was first described by researchers in 1952 and was later confirmed by others. When lycopene fails to form, only carotenes remain for fruit color. An orangey-red color results. In production areas where temperatures do not exceed 85 degrees (F), much higher red color develops.

TOMATO FRUIT CRACKING. Radial cracking occurs during rainy periods, when rains follow long dry periods. Fruit exposed to the sun may also develop cracks. Maintain a uniform water supply through the use of drip irrigation or mulches. A full leaf canopy will also help protect fruit from the sun and reduce cracking.
 

Tomato Hornworm or Tobacco Hornworm
Symptoms: Tomato leaves eaten, areas of fruit eaten, black, pellet-like droppings on and below plant.  
Possible culprit: Tomato hornworm. 
Solution: Hand pick in evening or morning. Use sprays that contain Bacillus thuringiensis, a less toxic microbial pesticide, to control young hornworms.

 
 Blossom End Rot
Symptoms: Tomatoes are brown or black on the bottom end. 
Possible culprit: Blossom end rot. Due to a calcium imbalance, brought on by cycles of too much or too little water; other factors that may contribute to blossom end rot include improper soil pH (tomatoes prefer soil in a range of 6.0-7.0) and too much nitrogen fertilizer.
Solution: Maintain even soil moisture. Avoid varieties most prone to it.


Root Knot Nematodes
Symptoms: Poor vigor, reduced yields, tomato leaves turn brown from the bottom up. Swellings on the roots. 
Possible culprit: Root knot nematodes. 
Solution: Plant resistant varieties, labeled "VFN". Rotate crops. Solarize soil. Add compost.


Root Rot
Symptoms: Tomato plants grow slowly and wilt. Roots have water-soaked areas that turn brown and dry up. 
Possible culprit: Phytophthora root rot, common in overwatered clay soils. 
Solution: Avoid heavy watering for long periods. Water more frequently for shorter periods. Pull out and discard plant if problem persists.

Fusarium Wilt
Symptoms: Tomato plants turn yellow on one side, spreads to rest of plant. Inside of main stem at base is dark red (stem on right) instead of a healthy ivory color (stem on left). 
Possible culprit: Fusarium wilt. 
Solution: Plant resistant varieties, labeled "VFN". Rotate crops. Solarize soil. Remove old plants.

 
Verticillium Wilt
Symptoms: Older tomato leaves yellow, beginning between main veins. Internal stem is slightly tan colored, in small patches. 
Possible culprit: Verticillium wilt. 
Solution: Plant resistant varieties, labeled "VFN". Rotate crops. Solarize soil. Remove old plants.


RAIN-RELATED TOMATO PROBLEMS:

BACTERIAL SPECK: Hits during rain or overhead irrigation early in the season, during cool weather. Retards growth, reduces yields up to 25%, fruit spots, leaf spots. Leaf spots are near the edge of the leaf, dark brown with a yellow ring. Can spread throughout the leaf margin area. Common in cool coastal areas of CA. Solution: plant later in the season; avoid overhead watering.


BLACK MOLD: More common in the late season, when rain or free water affects ripening fruit. Can be cosmetic, or cause deep lesions. Pick fruit as it ripens; keep fruit surrounded by leaf canopy.


LATE BLIGHT: Develops during spring rain or overhead irrigation when air temperatures are near 70. The fungus overwinters on nearby areas where potatoes or tomatoes may have been planted. Purple-brown areas on leaves, turn to brown. Fruit may brown, but stays firm. Avoid sprinkler irrigation in cooler weather, especially if potatoes are nearby. Do not use sprinklers on bush-type tomatoes that have developed a dense canopy. Clean up and discard crops after harvest.

Tomato Cracking
  Can be rain or sun related.
Maintain a uniform water supply through the use of drip irrigation or mulches. A full leaf canopy will also help protect fruit from the sun and reduce cracking.

Other problems that may be attacking your tomatoes this summer include whiteflies (control with insecticidal soap), aphids (ditto), powdery mildew (give plants full sun, regular watering and avoid excess fertilizer; organic vegetable fertilizers are a better choice), tomato russet mites (don't plant tomatoes near petunias or potatoes) as well as cosmetic tomato problems such as cat facing (puckering of fruit caused by cool weather when plant bloomed) and concentric circles near the stem (due to sudden, rapid growth).