The calendar says July (or, in gardening parlance, "Fruit Pickin' Time!"). But our cool, wet spring has slowed the harvest of the backyard deciduous tree fruits. One taste would let you know that this is definitely not a typical year.
Even though the Flavor Supreme pluot crop (a cross between a plum and an apricot) is usually ready by now, a sample bite might cause you to spit it out. And it did.
It's easy this time of year to give in to the uncontrollable urge to pick, eat and wince. How can you tell when fruit is ready for harvesting? One way is to download the fruit harvest chart from Dave Wilson Nursery. The problem with relying on that chart: your location, and weather conditions, can vary from the suggested harvest times on that chart. Here's a sensory guide for the most common fruits and berries grown in backyard gardens around here. This year, because of the cool, wet spring, you can add a few more weeks to the harvesting schedule for each variety.
Suggested dates apply especially if you live in the low-lying areas of Northern or Central California.

• Cherries - Mid-May through mid-June, depending on the variety. Net the trees at the first sign of birds eating the fruit. Sample a cherry every few days until they pass your taste test. Keep the stems attached when picking to avoid damaging the fruit. Snipping instead of plucking will keep next year's fruit spurs intact.
• Figs: two harvests, usually: mid-summer and early fall. Harvest figs when their necks wilt and fruits droop.

• Plums, Pluots - June to September; color may be solid or mottled red, dark-blue or purple. Flesh is firm yet yielding to gentle hand pressure. Cool fruit immediately.
• Raspberries - June to September; color is red to black, depending on variety. Flesh should be soft, aromatic, juicy; should release easily from cap.
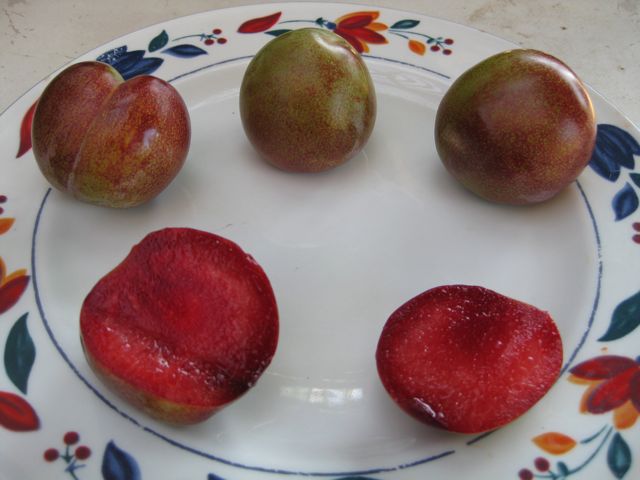 |
| Flavor Supreme Pluot, Fully Ripe |
Even though the Flavor Supreme pluot crop (a cross between a plum and an apricot) is usually ready by now, a sample bite might cause you to spit it out. And it did.
It's easy this time of year to give in to the uncontrollable urge to pick, eat and wince. How can you tell when fruit is ready for harvesting? One way is to download the fruit harvest chart from Dave Wilson Nursery. The problem with relying on that chart: your location, and weather conditions, can vary from the suggested harvest times on that chart. Here's a sensory guide for the most common fruits and berries grown in backyard gardens around here. This year, because of the cool, wet spring, you can add a few more weeks to the harvesting schedule for each variety.
Suggested dates apply especially if you live in the low-lying areas of Northern or Central California.
• Apples - Harvest varies from July to October; look for bright red color or a delicate blush overlaying the yellow base. Fruit should release easily from tree with the stem intact.
• Apricots - Mid-May through early July; color changes from dull greenish-orange to bright yellow-orange; Flesh is tender and yields to gentle hand pressure.
• Blackberries - Mid-June to early August; color changes from red to black; berries release readily, are soft with tender skin and are easily damaged. Place in refrigerator as soon as possible.

• Cherries - Mid-May through mid-June, depending on the variety. Net the trees at the first sign of birds eating the fruit. Sample a cherry every few days until they pass your taste test. Keep the stems attached when picking to avoid damaging the fruit. Snipping instead of plucking will keep next year's fruit spurs intact.
• Figs: two harvests, usually: mid-summer and early fall. Harvest figs when their necks wilt and fruits droop.
• Mulberries: Information from the California Rare Fruit Growers: White and red mulberry fruits (and hybrid fruits) are ready for harvest in late spring. The fruit of black mulberries ripen in summer to late summer. The fruits of white mulberries are often harvested by spreading a sheet on the ground and shaking the limbs. A surprising quantity can be gathered from a comparatively small and young tree. Black mulberry fruits are more difficult to pick. As the berries are squeezed to pull them loose, they tend to collapse, staining the hands (and clothing) with blood red juice. Unwashed the berries will keep several days in a refrigerator in a covered container. The ripe fruits of the black mulberry contain about 9% sugar with malic and citric acid. The berries can be eaten out of hand or used in any way that other berries are used, such as in pies, tarts, puddings or sweetened and pureed as a sauce. Slightly unripe fruits are best for making pies and tarts. Mulberries blend well with other fruits, especially pears and apples. They can also be made into wine and make an excellent dried fruit, especially the black varieties.
• Nectarines - June to September; most common skin colors start out as yellowish-orange and mature into an orange, red or reddish-pink color; flesh is usually yellowish with red tinge near the pit. Cool immediately.
• Peaches - Mid-May to September; same conditions as nectarines. Newer varieties may be bright red in color with an orange tint.
• Pears - July to October; ready when fruit is full size but still green in color. Ripen harvested fruit in a cool place (50-70 degrees) until color turns light yellow-green.

• Plums, Pluots - June to September; color may be solid or mottled red, dark-blue or purple. Flesh is firm yet yielding to gentle hand pressure. Cool fruit immediately.
• Raspberries - June to September; color is red to black, depending on variety. Flesh should be soft, aromatic, juicy; should release easily from cap.
• Table grapes - August to October; Fruit turns from green to reddish-amber, black, bluish, or golden yellow depending on variety. The berries will tend to crush easily and shatter when ripe.


