
If you're new to backyard (or front yard) gardening
and want to start growing vegetables, here are some tips:
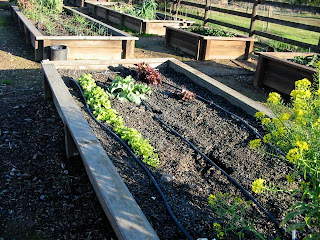
• Location, location, location: Give the garden a sunny spot. Pick a
garden location that gets at least six hours a day of full sun; more is better. Good
drainage is key. That's why raised beds are so popular (that, and the
soil in raised beds warms up sooner in the spring). Make sure a source
of water is nearby.
• Can you see the garden?
By late summer, I hear about a lot of ignored gardens among first time vegetable growers. Initially, they’re into it: planting, irrigating, fertilizing, weeding, and harvesting. However, by the time late August rolls around, their interest has waned, and the garden becomes a jungle of unpicked, overripe veggies and thriving weeds. One of the reasons I hear the most regarding this neglect: “I forgot to check the garden.” One tip that works for us: situate the vegetable garden so it’s visible from the kitchen window. If that’s not possible, put the garden where it can be seen from a high-traffic window, such as the dining room, family room, or a glass patio door.
• Know your soil.
Do a pH test (which measures the relative alkalinity or acidity of the
soil), or a full soil test. One of the best bargains for a complete soil
test is the University of Massachusetts.
They will analyze your soil for under $20 (at this writing). They also
include a brief interpretation of what all those measurements mean to you. Or, purchase an inexpensive pH and macronutrient test kit, one that will tell you your soil's acidity/alkalinity, along with its needs for nitrogen, phosphorus and potassium.
• Amending the soil
with a good quality compost is a great idea, if your soil has never
been amended. Mix in a cubic yard of compost for every 300 square feet of garden. That is a
rule of thumb that I follow. After the first growing year, no
rototilling is necessary. Just add a few inches of compost to the top of
the soil; let the winter rains work the compost in.
• Fertilize the soil. I prefer to use low-dosage organic
fertilizers, such as a mix of fish emulsion and sea kelp. There are
plenty of great all-in-one organic fertilizers on the market labeled for
use in vegetable gardens. Be sure to follow the label directions. If
using a non-organic granular fertilizer (such as a 10-10-10-
formulation), put a tablespoon in the bottom of the planting hole, cover
with a couple inches of soil, and water in thoroughly. Don't let the
sensitive roots of the tomatoes and peppers come in direct contact with
the fertilizer. If you'll be using a water soluble, non-organic
fertilizer on an every-other-week or monthly basis, use half the
recommended amount for this first feeding.
• Top the soil with
a thin layer of worm castings; put two to four inches of a coarse mulch
on top of that. Worm castings improve the overall tilth of the soil as
well as the microbial activity. A mulch of bark or chipped/shredded tree
trimmings helps preserve soil moisture and warmth, controls weeds, and
slowly feeds the soil as it breaks down. Instead of asking Santa for a
rototiller, ask for a chipper/shredder. Your soil will thank you!
 |
| Oregon Spring V |
Good sources of information:
That's the basics! What you plant is up to you and your family's appetites.
Read on for more detailed gardening information for the first timer:
 |
| Peppers spaced 2 feet apart. They WILL fill the bed! Trust me on that. |
For
tomatoes and peppers:
• Plant tomatoes deeply. Pinch off the lower leaves of the plant
and bury the tomato deeply, leaving only the top four sets of leaves
above ground. New roots will form along this underground, stripped
section. If it's a very tall plant, dig a trench, lay the plant on its
side in the trench, and bend the top section up (carefully) to stand
above the soil level; fill in the trench.
 |
| Tomatoes spaced three feet apart. They also WILL FILL THE BED. |
• Give tomatoes room. Full-size tomatoes grow on vines that can
reach five feet high or more. Plant them three to four feet apart.
Prepare a staking system now while they're still manageable.
• Space peppers about two feet apart. According to local horticulture professor Debbie Flower, peppers can be planted deeply, just like tomatoes.
• Water. Don't let the soil dry
out while the roots are getting
established. During the warmth of summer, water tomatoes and peppers
regularly, keeping the soil evenly moist. One common problem with
tomatoes, blossom end rot (the bottom of the tomato turns brown and
mushy), can be traced in part to irregular watering habits. Deep,
infrequent waterings (once or twice a week) with drip irrigation or
soaker hoses work great. An added benefit: drip systems and soaker hoses
can be hooked up to a battery operated timer, watering these summertime
treats while you're vacationing. Because raised bed plantings and
containerized plantings will dry out quicker, they will need more
frequent irrigations.

Use a moisture meter
to determine when the soil is beginning to dry out at the root zone to
help you develop a watering schedule. Remember, that schedule will
change as the weather fluctuates. Prices of moisture meters vary considerably. The one pictured on the left has worked for me for over 10 years. The green one on the right, although inexpensive, has surprised me with its durability over the years, and fairly accurate and consistent moisture readings. Also, it measures pH and light (of questionable accuracy). Still, it might last you longer than a year. Maybe.
When deciding where to plant your vegetable garden, choose the best
available location by keeping the following factors in mind:
When is the soil ready to plant? You may have little choice
concerning the soil type
available to you, but you can use a simple test to find out whether your
soil is in good condition for planting. Squeeze a handful of soil to
test for moisture content. If the squeezed soil forms a clump, the soil
is too wet to work. If you work soil that contains this much moisture,
it might form into hard, cement-like clumps, which can cause problems
for the remainder of the year. If the soil crumbles easily when it is
squeezed, it is in an ideal condition to work. However, if that handful
of soil is bone dry, water the area thoroughly a day or two before
working or planting the soil.
 |
| Broccoli in the Winter Garden |
The Year-Round Garden. In California, there are 3
to 4 seasons, depending on
your location, in which vegetables can be grown. Yet, many gardeners
grow only summer crops. By planting a spring crop, a summer crop, and a
fall crop, a gardener can get 3 crops from the same space.
Level ground is best for growing vegetables. It is easier to
prepare, plant, and irrigate than sloping ground. If you must plant on
sloping ground, run rows across the slope, not up and down, to keep the
soil from washing away during irrigation.
Preparing
a Garden Plan
It is best to plan on paper before planting your garden. A well-planned
garden can provide fresh or preserved vegetables for use all year.
Plant perennial crops,
such as rhubarb and asparagus, to one side of the garden so that the
plants are not disturbed by preparations for future crops. Plant tall
crops, such as corn and pole beans, on the north side of the garden so
that they will not shade low-growing crops.
 Trellising and staking. Do not grow horizontally what you can
grow vertically. Twining crops, such as tomato, squash, cucumber, and
pole beans, use a great deal of space when allowed to grow along the
ground. Trellises, stakes, or other supports minimize the ground space
used and increase garden productivity. Support materials can consist of
wood, extra stakes, twine, or a nearby fence.
Trellising and staking. Do not grow horizontally what you can
grow vertically. Twining crops, such as tomato, squash, cucumber, and
pole beans, use a great deal of space when allowed to grow along the
ground. Trellises, stakes, or other supports minimize the ground space
used and increase garden productivity. Support materials can consist of
wood, extra stakes, twine, or a nearby fence.
For the beginning vegetable gardener, choose more hybrid vegetables than heirlooms.
Hybrid vegetables are bred to have more disease and pest resistance, as
well as larger yields. Heirloom varieties have more unique shapes and
flavors, but can be problematic for the first time gardener. Sure, buy
some heirlooms for the flavor; but for your first garden, plant mostly
hybrids. After that, you may prefer the flavor of the heirlooms. I still
plant a mix of both. Just starting out? In most cases, choose plants over seeds, it's a lot easier. Exceptions would be sweet corn, squash and melons. These are big seeds that germinate readily; but wait until nighttime temperatures are steadily over 50 degrees before planting these seeds in the garden.
Succession planting consists of sowing seeds of a given crop at
1- to 2-week intervals to produce a continuous supply of vegetables.
Corn, beans, lettuce, turnips, and beets are well suited to this
practice.
Intercropping involves planting early-maturing crops between the
rows of late-maturing crops to increase production in a small area. For
example, beans, radishes, green onions, spinach, or leaf lettuce may be
planted between rows of tomatoes, peppers, cabbage, or corn. The
quicker-maturing crops will be harvested before the others become very
large.
What to Plant
Plant enough of each vegetable crop to meet your family's needs for
fresh, stored, and preserved supplies. When choosing vegetable varieties
or hybrids, consider such factors as disease resistance, maturity date,
compactness of plant, and the size, shape, and color of the vegetable
desired. Refer to the individual vegetable links on the Farmer Fred Interactive Vegetable Planting Calendar for variety recommendations. For more information about some of my favorite tomato varieties, click here.
• Conquer ADD in the garden.
We all have a bit of attention deficit disorder when we go into the yard. Intending to do one task, we get sidetracked by something else. Before you know it, it’s dinner time and the vegetable plot hasn’t been checked for aphids and tomato worms (your original task in the morning). Limit the “distraction time” by keeping a set of garden tools, trash can and a source of water nearby the vegetable plot. Position the garden nearby a water faucet and hose. Smaller hand tools can be kept in a converted outdoor mail box adjacent to the garden; for larger tools, perhaps a small shed (or large dog house) nearby. Do anything it takes to reduce the number of trips to the garage to get what you need for the garden. Because you know there’s something in the garage that will also demand your attention!
Tools
You only need a few, good quality tools for a small home garden:
Trowel. One of the handiest garden gadgets, it is
useful for
transplanting and for loosening soil around plants.
 Shovel. Use a
round-edged shovel for digging.
Shovel. Use a
round-edged shovel for digging.
Spade or spading fork. Use to turn the ground, to turn under
organic matter, and to break up large clumps of soil. In my heavy clay soil, I find the spading fork indispensable.
Rake. Use to smooth out the soil after spading and after
preparing the seedbed. You can also use it for clearing up rubbish and
removing small weeds.
Hoe. Use a long-handled hoe to remove tough weeds and to cover seeds after planting.
When turned sideways, you can also use a hoe to dig a V-shaped row for
planting.
Following these simple guidelines will keep your tools in good
condition:
Clean tools after each use. A putty knife, jet nozzle on a hose or a wire brush is good for scraping
off dirt. If tools get rusty, soak them in kerosene for a few hours,
then use a wire brush or fine sand to scrub off the rust. Oil them with a light lubricant after cleaning.
Keep cutting tools sharp. The basic sharpening tool for hoes, pruners and shovels is an 8" mill file.
Keep tools in a
dry place to prevent rust.
Growing your own food is easy, fun for the entire family and good for you! The healthiest food you can eat is the food you grow yourself.


 • The lantana variety “Luscious”. Flower colors come in a wide array, including shades of fuchsia, orange and yellow, blooming from planting until a hard frost. This lantana gets about 18-30 inches tall with a spread of about 20-30 inches.
 • Lo & Behold buddleia. “This low growing butterfly bush variety is very showy and reliable,” says Galli. “Its smaller size (18-30 inches) makes it a great border plant, with flowers from summer through early fall. It attracts so many butterflies, it looks like an airport in front of our house.” Flower colors include blue and purple.
 • Playin’ the Blues salvia. No California pollinator garden would be complete without an unthirsty, hummingbird-loving salvia variety. “Playin’ the Blues” attracts bees and butterflies as well, with blue-purple flowers that reach for the sky on a 24-48 inch plant. This salvia variety doesn’t produce seed, so it has a very long bloom season, possibly throughout the year if there’s a mild winter.
 • Make it look like a neon sign to attract the attention of hummingbirds, bees and butterflies. Mass each variety together in a sizeable area, about four feet by four feet, or more.
 • Everybody needs water. Install a water feature in your pollinator garden. It could be as fancy as a recirculating fountain, or as simple as a pan with water. Put that water feature in an area where predators (cats) can easily be spotted by hummingbirds.


