Washington Navel and other varieties of citrus are beginning to ripen in our area, and many backyard gardeners are horrified at what they are seeing currently, wondering if Mother Nature is pulling some sort of Halloween prank.
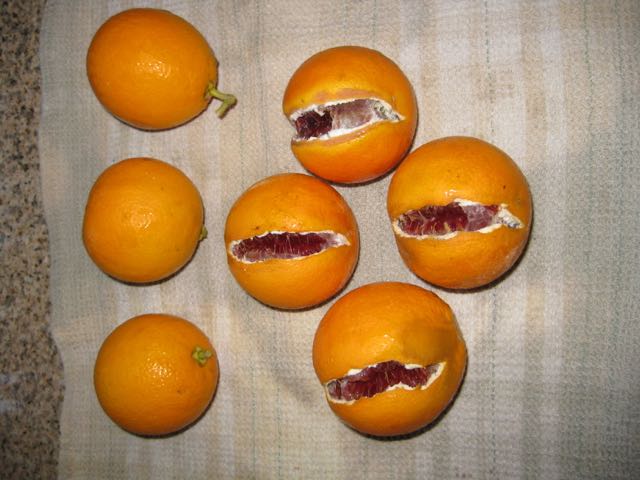
Jim asks: “I have a beautiful navel orange tree and for the past two years the fruit keeps splitting. The oranges start out fine and all of a sudden as they get bigger, they split right down the middle.”
Donna chimes in: “My reliable orange tree is going south. I watered it for 10 minutes every morning and evening during summer. Is this splitting issue a disease?”
Donna chimes in: “My reliable orange tree is going south. I watered it for 10 minutes every morning and evening during summer. Is this splitting issue a disease?”
Teresa, writes to the garden e-mail bag: "My mom has a wonderful orange tree, and the fruit is just starting
to grow. However, most of them are splitting before they even get larger
than a fist. What makes them do that?" Steve echoes this chorus: “Why are my oranges splitting now?”
You may be facing the same conundrum with your own backyard citrus.

The short answer: splitting oranges are usually due to stress to the tree, usually a combination of fluctuating temperatures, humidity, soil moisture and possibly fertilizer levels. Oh, and an on-going drought.
The long answer, from Pam Geisel, a UC Cooperative Extension Farm Advisor, who has studied the problem of citrus split: When hot weather is combined with high winds, navel orange trees become drought stressed and begin to take water from the young fruit, causing the fruit to soften and the leaves to cup. If the tree is then irrigated heavily, the dehydrated fruit swell, causing them to crack. Young trees or dwarf varieties with relatively small or shallow root systems, as well as trees grown in very sandy or porous soils that do not retain moisture well may be more susceptible to fruit splitting.
Backyard gardeners can help minimize fruit split in navel oranges by paying attention to the summertime weather forecasts. When hot winds are predicted, irrigate before the winds begin. After the hot winds subside, irrigate lightly for a few days and then resume a normal irrigation schedule. Adding four inches of an organic mulch to the surface beneath the tree can also moderate soil moisture loss, as well as feeding the soil and controlling weeds.
Geisel also advises: "Instead of a single large application of quick release fertilizer each year, smaller monthly applications throughout the growing season (Feb. through May) may help keep nutrient levels constant."
Citrus grower Lance Walheim, author of the book, "Citrus ",
says that a good watering pattern for oranges includes adjusting it to
the weather. Allow the top three or four inches to dry before irrigating
deeply. He explains that too much water retards the spread of roots and
promotes soil-borne diseases. An orange tree that gets too little water
will grow poorly and may die. Keep an eye out for the signs of moisture
stress on the orange trees: wilting or off-colored foliage.
",
says that a good watering pattern for oranges includes adjusting it to
the weather. Allow the top three or four inches to dry before irrigating
deeply. He explains that too much water retards the spread of roots and
promotes soil-borne diseases. An orange tree that gets too little water
will grow poorly and may die. Keep an eye out for the signs of moisture
stress on the orange trees: wilting or off-colored foliage.
Ask a dozen citrus growers how they fertilize, and you may get 12 different answers. The University of California has several recommendations: "Apply one application of nitrogen (ammonium nitrate, ammonium sulfate, or urea) in late December to February. Alternatively, fertilizers can be applied in several applications. Many commercial growers apply 1/3 of the total nitrogen needed in February, July, and September. Using a balanced citrus food may help to correct mineral deficiencies as well as provide a more complete nutrition. Manure should be applied in the fall so that the winter rains can leach the salts. Steer and chicken manure should be used sparingly because they are high in salt and may burn the trees. Mature citrus trees use 1-1.5 lb. of actual nitrogen (N) per tree per year."
Ask a dozen citrus growers how they fertilize, and you may get 12 different answers. The University of California has several recommendations: "Apply one application of nitrogen (ammonium nitrate, ammonium sulfate, or urea) in late December to February. Alternatively, fertilizers can be applied in several applications. Many commercial growers apply 1/3 of the total nitrogen needed in February, July, and September. Using a balanced citrus food may help to correct mineral deficiencies as well as provide a more complete nutrition. Manure should be applied in the fall so that the winter rains can leach the salts. Steer and chicken manure should be used sparingly because they are high in salt and may burn the trees. Mature citrus trees use 1-1.5 lb. of actual nitrogen (N) per tree per year."
I'm no fan of quick release, ammonia-based products; it's too easy to apply too much, and could damage your tree. Others have weighed in
on why these salt-containing formulations are bad for your garden. But
for those of you that can't resist those $3 bags of Sulfate of Ammonia
piled up outside the drug store, remember that Sulfate of Ammonia
(20-0-0) consists of 20% actual nitrogen. So, applying one pound of
actual nitrogen over three feedings per year per mature citrus tree
equals about a pound and a half of ammonium sulfate per application,
spread evenly beneath the outer dripline of the tree, following the
label directions.
My citrus feeding regimen for my
containerized (half-barrels) citrus trees is organic, applied every
other week during the growing season (February through September): a
combination of water soluble fish emulsion and sea kelp. Fertilizer
leaches through containerized plants more quickly than in-ground plants.
So, a light feeding, but more often (every other week instead of
monthly), mitigates that loss.
There are plenty of complete and balanced organic fertilizers available for fruit trees, some that only need to be applied a few times a year.
There are plenty of complete and balanced organic fertilizers available for fruit trees, some that only need to be applied a few times a year.
Timed-release synthetic fertilizers
offer the convenience of supplying nutrients at an even rate, but are
usually more expensive.
Whichever fertilizer you choose, apply it according to the label directions.
Lance Walheim
also advises against fertilizing oranges after the end of summer. Late
applications of fertilizer to deficient trees, he says, can lower fruit
quality, make the rind tougher and exposes new growth to the ill
effects of a winter freeze.
There are no pests or diseases that cause splitting, nor is there a chemical control for it, explains Pam Geisel. It is a problem that stems from environmental or cultural conditions. Blame the weather this year. Next year, mulch, water and fertilize that navel orange tree correctly to help minimize the fruit split.
There are no pests or diseases that cause splitting, nor is there a chemical control for it, explains Pam Geisel. It is a problem that stems from environmental or cultural conditions. Blame the weather this year. Next year, mulch, water and fertilize that navel orange tree correctly to help minimize the fruit split.


